Sometimes I overbuy beautiful fruit at the farmer's market. Usually it's a way to force myself to make something new. A couple of weeks ago I bought a few pounds of peaches. We were going to have dinner with friends, and I thought that I would make a peach crostata for dessert.
We ended up going out to dinner instead. It was my birthday, so I was actually quite happy not to make my own dinner. But I ended up with a bag full of ripe peaches to contend with. Rough, I know.
I had been eyeing a recipe for pickled peaches in the Chez Panisse Fruit Cookbook to serve with grilled duck breasts, but it just didn't seem to have the right balance I was looking for.
Inspiration came on a walk through the neighborhood when I saw some ripe figs hanging from my neighbor's tree. I haven't bought figs at the market since discovering two fig trees in the neighborhood. For one, figs are mighty expensive at the market and totally sub par compared to picking them fresh from a tree when they are perfectly ripe. I don't think there is any food quite as sexy as a ripe fig.
So that settled it. I was going to make a peach and fig chutney. The sweet richness of the figs was just what I wanted to mellow out the "pickled" peaches. The original recipe called for the addition of pickled ginger which I left out. I didn't want a chutney with too much going on. The fruit was so beautiful, and I really just wanted to let their beauty shine through.
I also decided to leave the chutney on the juicy side so that it would have a bit of sauce to drizzle around the grilled duck. It was delicious! The chutney had the perfect sweet-tartness to balance out the richness of the duck. We served it with a bottle of pinotage that we brought back from South Africa last year. Perfect.
1 pound ripe peaches, unpeeled 1 tablespoon fresh lime juice 1/2 pound fresh ripe figs, such as Black Mission 3/4 cup cider vinegar, premium quality, unfiltered if possible like this 4 tablespoons honey 1 1/4 teaspoons mustard seeds pinch of kosher salt 2 teaspoon pomegranate molasses 1 tablespoon minced Serrano chili
Cut the peaches in half, remove the pits, and cut each half into 1 1/2 inch chunks. Toss the peaches with the lime juice and set aside. Remove the fig stems and quarter the figs lengthwise. Set aside.
In a skillet, combine the vinegar, honey, mustard seeds, salt, and pomegranate molasses. Place over moderate heat and reduce to a syrup, 6-8 minutes. Stir in the peaches and cook over low heat, covered, until softened but not mushy. This will take 5-15 minutes, depending on the ripeness of the fruit. Add the figs and chili and cook, covered, an additional 5 minutes.
Remove from the heat, transfer to bowl, and cool. Serve at room temperature or chilled.
I love cycling. Louis and I used to go on long cycles every weekend. We would generally cycle a 30 mile loop from our place up to Tilden Park in Berkeley and back home along Skyline Blvd. We live in such a beautiful place, and the views are stunning from Skyline Blvd. which runs along the ridge of the East Bay hills.
Unfortunately we haven't cycled much in the last several years. Louis got pretty busy gigging on the weekends, and then Ella came along. We just got out of the habit. But I missed it. I feel a great sense of freedom when I'm on a bike. It is definitely my favorite form of exercise.
We got new bikes about a month ago and have been going on lots of rides. I've found that the best way to get Ella excited about being strapped into the trailer is to promise a picnic along the way.
So we cycled up to Robert's Park and had a picnic.
I made a variation of a salad that I make at least once a week. It contains some sort of grain, most often barley or quinoa, and a mix of whatever vegetables look good at the market. Sometimes I mix in some cheese, nuts or beans. This type of salad is endlessly versatile, and it keeps well which makes it an excellent choice for a picnic.
I've become quite addicted to these salads. Barley has a lovely chewy texture that is totally satisfying. I tend to use quite a bit of vinegar because the barley absorbs a lot as it sits. So, if you aren't serving the salad right away, you should taste and adjust the seasoning again before serving.
Corn, Tomato and Barley Salad
2 ears of corn, kernels cut from cob 1 zucchini cut into 1/2 inch dice 1/2 pint of cherry tomatoes sliced in half 1 cup of farro or barley (whole grain, not pearled)
1 shallot diced
2 tablespoons extra virgin olive oil
2-4 tablespoons red wine vinegar
Salt and pepper
handful of arugula
Combine the barley with 4 cups of water and salt to taste in a saucepan. Bring to a boil and cook at a bare simmer until just tender, 15-20 minutes. Drain in a colander and set aside.
Warm the olive oil in a saute pan over medium heat and add the corn and zucchini and 1/2 teaspoon salt. Cook until softened but still al dente, about 5 minutes. Add the diced shallot and sliced cherry tomatoes. Turn off the heat, add about 2 teaspoons of vinegar and taste for salt. Add the vegetables to a bowl with the barley. Toss in a handful of arugula or torn basil leaves. Taste again for balance of salt and vinegar.
Louis and I had our 10th wedding anniversary back in March. My mom offered to take Ella for the whole weekend, so Louis and I went off to celebrate in the way that we usually do. By eating lots of good food and drinking lots of good wine, in a beautiful place. Arguably, one of the best places in the country to do such things is the Napa Valley. A year or so ago I had imagined that a 10th wedding anniversary would be a great time to go to the French Laundry. But as the time approached for me to try my hand at winning the lottery (a.k.a booking a reservation at the French Laundry), I just could not justify spending that amount of money on one meal. Not when there were so many different places that I wanted to try.
One of the places that I had been wanting to go to is Ubuntu. Ubuntu was recently named one of the ten best new American restaurants by the New York Times and the chef nominated for a James Beard Award. Ubuntu is a vegetarian restaurant with a yoga studio upstairs. As you eat you can see the silhouettes of people doing yoga poses. It is all quite fitting to the nature of the food. The food forces you to be in the moment. To experience the essence of the artfully prepared vegetables. But I guess if you're not in the mood to experience the wonder of biodynamically farmed vegetables you might be pissed off that you just spent $12 for a pile of radishes with a few slices of cheese. But I loved it. I appreciate when dishes are prepared thoughtfully and reverence is given to the ingredients used.
Although Ubuntu excels with their use of vegetables, one of my favorite dishes on the menu was the Chickpea Fries with Romesco Sauce. Chickpea fries are made with garbanzo bean flour and the batter is actually very similar to polenta. In fact, I think I prefer it to polenta. The garbanzo bean flour has a sweet earthy quality and a creamy texture. I haven't tried it grilled yet, but the fried version is delicious. It develops a delicately crisp crust that I found totally addictive.
I made some chickpea fries recently when somefriends came for dinner. I realized the following day that I hadn't put the memory card in my camera when taking pictures of dinner. Fortunately the Foodie Hunter was also capturing some lovely images with her camera. She posted some photo's and had some very lovely words as well. I have to say that the most I can ask for when preparing food for others is that they "get" the food. I never haphazardly throw a menu together. I definitely put thought into what I feed people. I take their preferences into account. I also consider the weather and which fruits and vegetables are at their peak. Overall, I try to convey a mood through my food. I think most people would agree that I'm a good cook, but to me, the highest praise comes when someone actually understands my food and my process. So I would like to thank the Foodie Hunter for her understanding. She will always be welcome at my table. This particular menu ended up being:
Grilled Asparagus and Chickpea Fries with Romesco Sauce
*
Grilled Salmon with a Balsamic Butter Sauce on a bed of Sautéed Corn and Shitake Mushrooms
*
Honey Roasted Apricots with a Chez Panisse Almond Tart and Olive Oil Ice Cream
Chickpea Fries Adapted from Ubuntu via Oprah Magazine
1 ¼ cups chickpea flour
½ cup cornmeal
1 clove garlic, finely grated on microplane
1 ½ tablespoons kosher salt
3 tablespoons parsley chopped
vegetable oil for frying
In a stainless steel pot over high heat, combine chickpea flour, cornmeal, 3 1/2 cups of cold water, garlic and salt. Whisk gently to prevent sticking on the bottom.
Once the mixture begins to thicken and bubble ( after about 3-4 minutes), reduce heat to medium and switch to a rubber spatula. Stir constantly and scrape the bottom of the pot to prevent scorching. Add the parsley. Continue cooking for 6-8 minutes. Taste and correct for seasoning. Lightly oil a 13x9 inch baking dish and pour in the batter. Spread the mixture out evenly and top with plastic wrap. Refrigerate for 4 hours until completely cold and set.
Cut into "fries" about 3 inches long. Heat about 1/2 inch of oil in a non-stick pan to 375F. If the oil isn't hot enough, the fries will soak up too much oil and fall apart. Cook until the fries are golden brown on all sides, about 2 minutes each on top and bottom sides. Remove and set on paper towels. Sprinkle with kosher salt to taste and serve with romesco sauce.
Serves 4-6
Romesco Sauce
Adapted from The Zuni Cafe Cookbook
Romesco sauce is great as a sauce for vegetables and fish. I usually serve it in place of cocktail sauce with poached shrimp. It can also be mixed with a bit of mayonnaise for a romesco aioli.
½ ounce raw almonds (about 2 tablespoons)
1 ounce hazelnuts (1/4 cup)
½ cup coarsely chopped tomatoes
1 red bell pepper roasted peeled and chopped
¼ cup extra virgin olive oil
1 ancho chili
2-3 garlic cloves peeled
1 teaspoon red wine vinegar, more to taste
1 teaspoon hot paprika
½ teaspoon mild paprika
Salt
Preheat oven to 325F
Roast the hazelnuts until the skins darken and start to split, 10-15 minutes. While they are still hot, bundle them in a towel, then scrunch and massage them to rub off most of their skins. Pick out the nuts and set aside.
Turn the oven to broil. Spread the tomatoes ½ inch thick in a small, shallow baking dish. Trickle with a little of the olive oil and place under the broiler. Cook until the tomatoes char slightly and bubble. Remove fro the broiler.
Meanwhile, pour a few cups of boiling water over the chili and leave to swell for a few minutes. Drain, then stem and seed the pepper.
Thickly slice the garlic, then pound to a paste in a mortar. Scrape into a processor and add the chili, almonds, and hazelnuts. Grind to a fine, moist paste, scraping the sides. Scrape the tomatoes and pepper and process to a paste. Add the vinegar, paprika, the remaining oil and salt to taste. Taste again adding more salt and vinegar to taste. It should be bright with acidity, otherwise it may taste a little flat or bitter.
Several years ago there was an issue of Saveur magazine focused entirely on California. One of the articles featured a Chez Panisse reunion picnic. I have fantasies about being at that picnic. In fact, that picnic is the perfect picture of my ultimate food fantasy. It took place in Bolinas in a grassy meadow dotted with trees. There was an old barn near one end, and it was all nestled between coastal hills. There was a long wooden table piled with dishes brought by the various guests. Can you imagine being at a pot luck with Judy Rogers, Alice Waters, Paul Bertolli, David Tanis, Michael Wild, Margaret Gradeand Deborah Madison?!
Margaret Grade brought a warm potato and purslane salad. I had never used or tasted purslane before. Not long after I saw that article, I found some purlane at the farmer's market and decided that even though I couldn't be at that picnic, I could still have one of the dishes that was served there. It is essentially a German potato salad with the addition of purslane.
Purslane is often considered a weed, but it is delicious. It is one of the best vegetable sources of omega 3 fatty acids and is high in vitamin C. It is a succulent which gives it a sort of irresistible texture. It is soft but toothsome with a slightly acidic and peppery flavor. It is good raw in salads or sauteed like spinach.
Every time I see purslane, I think of this potato salad and that Chez Panisse reunion picnic. I will probably never go to one of those picnics, but I do have a long wooden table that my friends can sit around to enjoy good food and conversation. I think I'm getting pretty close to realizing that fantasy.
Warm Purslane and Potato Salad adapted from Margaret Grade
1 lb. sliced pancetta, cut into pieces about 1/2 inch square 3-4 cipolline onions or shallots, peeled and chopped 2 lbs. baby fingerling or Yukon gold potatoes 4 cups chicken stock 1 tablespoon honey 1/4 cup white wine vinegar Leaves from 3 sprigs fresh thyme Salt and Freshly ground black pepper 1 lb. purslane, cleaned
Cook pancetta in a large, heavy skillet over medium heat, stirring occasionally, until crisp, 15-20 minutes. Transfer pancetta with a slotted spoon to paper towels to let drain. Add onions to skillet and cook, stirring often, until soft, about 5 minutes. Set pan aside.
Put potatoes and stock into a large pot and bring to a boil over high heat. Reduce heat to medium and simmer until tender, 10-20 minutes. Drain, reserving 1/2 cup of the stock . Place potatoes aside in a large bowl with the purslane and pancetta. Return reserved stock to pot and boil over high heat until reduced by half, 2-3 minutes.
Return pan with onions and pancetta drippings to stove. Heat over medium heat until hot. Stir in the honey, reduced stock, vinegar, thyme, and salt and pepper to taste. Pour hot dressing over potatoes and purslane, toss quickly and serve.
A couple of weeks ago my new copy of The Greens Cookbookarrived. My original copy was a small paperback version that I bought in London in 1997. That little book turned out to be invaluable to me. Not only because I was working for a family and was responsible for making dinner every night. But because it had tables converting American measures, temperatures and ingredients into British. At that time I had no idea that an eggplant was an aubergine or that zucchini was courgette. When I went to South Africa for a year following London, that little paperback came with me. It turned out to be a great resource in South Africa as well since their English and measures are British. So that little book had been through quite a lot, and was starting to fall apart.
The Greens Cookbook is an incredibly special book to me. It is chock full of great recipes, including a sesame noodle recipe that is my potluck standby. But the reason that it holds such a special place for me is because it is representative of the first year that Louis and I spent together. We met at a youth hostel in Paris and a couple of months later, I went to London to be with him. We were only able to see each other on weekends because he was working in South London and I was in Northern London. A few months later he went back home to South Africa to finish his final year of college, and I went with him. It was great to finally be together in our own space. Louis was studying to be an engineer and was studying all the time. We had no T.V., no radio, no computer. My only source of entertainment was when Louis would take breaks from the books to serenade me with his guitar. It was actually pretty great.
I would spend the majority of the evening cooking. One of the things that I made most frequently was foccacia bread. I made many kinds of foccacia, but one of my favorites was also the most simple. The dough is topped with sliced onion that has been tossed with olive oil and some thyme or rosemary and salt. The onions become soft in some areas and crispy and caramelized in others. It is the perfect accompaniment to a bowl of soup.
So when the new hardbound Greens Cookbook arrived, I began flipping through it. It was like reminiscing with old friends that I hadn't seen in a while. My eyes became transfixed on one particular recipe, Turnip Soup with Turnip Greens. I hadn't even known that recipe was in there! And it was just the perfect thing because I had a bunch of turnips in the fridge and the weather had turned cold. So it was time to make soup and foccacia bread and remember our days in Cape Town.
Turnip Soup with Turnip Greens adapted from The Greens Cookbook
This soup is delicious. Milk is used as the broth, so it is creamy without being heavy. The turnips are blanched to remove any bitterness, and they become sweet stewed with the leeks and milk. I just love that this recipe uses the turnip and its greens. The sharpness of the greens is a lovely counterpoint to the sweet turnips.
1 1/2 pounds small turnips (about 1-2 inches across) weighed without their greens Salt 5 tablespoons butter 2-3 leeks, white parts only, sliced 6 branches thyme 4 cups milk 2-3 cups turnip greens
Peel the turnips (thickly, if they are large and mature) and slice them into rounds about 1/4 inch thick. Bring 3 quarts of water to a boil; then add 2 teaspoons salt and the turnips. Cover the pot and cook for 1 minute; then drain.
Melt 3 tablespoons of the butter in a soup pot with 1/2 cup water. Add the leeks, the blanched turnips, the thyme, and 1 teaspoon salt. Stew them, covered, over medium low heat for 5 minutes, and then add the milk. Slowly heat it without bringing it to a boil, and cook, stirring occasionally, until the turnips are completely tender.
Cool the soup briefly; then puree it in a blender. If necessary, thin it with additional milk or water. Season to taste with salt, if needed, and freshly ground pepper.
Sort through the turnip greens and remove any that are bruised or especially tough looking, and wash them. Melt the remaining 2 tablespoons of butter in a pan, add the turnip greens, and cook them over medium heat until they are tender, about 5-10 minutes. Season with salt and pepper. Remove the cooked greens to a cutting board and chop them, roughly or fine, as you prefer; then add them to the soup and serve.
Serves 4-6
Focaccia Bread adapted from The Greens Cookbook
1 package active dry yeast (2 1/2 teaspoons) 1 cup warm water 1 teaspoon salt 3 tablespoons extra virgin olive oil pinch sugar 2 1/2 cups unbleached white flour or a mixture of whole wheat and white Coarse sea salt
1 large red or white onion sliced 1 teaspoon thyme chopped 2 tablespoons olive oil salt
Dissolve the yeast in the warm water with the salt, olive oil, and sugar. Stir in the flour in two or three additions. Once a dough has formed, turn it out onto a board dusted with flour, and knead it for several minutes, adding only enough flour to keep the dough from sticking. When the dough is smooth and shiny, set it in a lightly oiled bowl, turn it over once, cover and put it in a warm place to rise, until it is doubled in bulk, about 30-40 minutes.
After the dough has risen, turn it out onto an oiled baking sheet, and pat it out about 1/2 inch thick. Toss the onion with the thyme, 2 tablespoons olive oil and salt to taste and spread out over the top of the dough, pressing lightly on the onions so that some of them sink into the dough. Let the dough rise for 20 minutes.
Preheat the oven to 450F. Bake the bread in the top third of the oven for 20-30 minutes, or until the bread is nicely browned.
For many of us, food is the vehicle through which we experience life. We plan vacations around the restaurants we would like to visit. I think that the best way to experience the culture of an area is through the local food. For many who visit San Francisco, Tartine Bakeryis one of those destinations.
They produce the best bread that I have ever had. It is a levain style with a moist chewy interior and crispy crust. I think it rivals the baguettes in France for my favorite bread ever. Tartine is located in a rather hip neighborhood and right next door to another destination restaurant, Delfina. It's also within a block or two of Bi-Right Creamery. I live in Oakland which is really just a short train ride into the city, but surprisingly I have only been to Tartine twice.
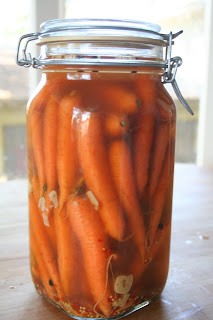
The first time I went I ordered one of their pressed sandwiches. It wasn't particularly memorable, but what I do remember are the pickled carrots that were served with it. Sweet, spicy, crunchy. I wished that I could just have a big plate of those. So when I saw a recipe for pickled carrots in Molly's book, I didn't hesitate, not even for a minute. Fortunately, I had just gotten some baby carrots at the farmer's market, and their fate was sealed.
I have been tasting a carrot (or two) each day, and the strength of the brine is mellowing more each day. The next time I make these I will probably double the amount of red pepper flakes below. So if you like spicy, I would suggest starting out with 2 teaspoons of red pepper flakes.
2 cups apple cider vinegar 2 cups water 1/4 cup granulated sugar 6 sprigs fresh thyme 5 large garlic cloves, thinly sliced 1 1/2 teaspoons black peppercorns, cracked 1 1/2 teaspoons red pepper flakes Heaping 1 1/2 teaspoons salt Heaping 2 teaspoons brown mustard seeds 1 1/2 pounds small (finger-sized) carrots, or standard carrots cut into sticks about 1/2 inch wide and 3 inches long
In a medium saucepan, combine 1 1/2 cups apple cider vinegar, water, sugar, thyme, garlic, black peppercorns, red pepper flakes, salt and mustard seeds. Bring to a boil over medium high heat, then reduce to a simmer and cook, stirring occasionally, for 10 minutes. Remove the pan from the heat, and let cool for 5 minutes. Stir in the remaining 1/2 cup vinegar.
Wash the carrots and put them in a large, heatproof bowl, and pour the warm brine over them. Cool to room temperature.
While the carrots cool, wash 2 quart sized canning jars and their lids in warm, soapy water.
When the carrots and brine are cool, distribute the carrots evenly among the jars, arranging them snugly. Divide the brine evenly among the jars. The carrots should be covered completely by the brine. If they are not, add a mixture of 2 parts vinegar and 1 part water to cover.
Seal firmly and refrigerate for at least 3 days, or, preferably, a week. Carrots are dense and take time to absorb the brine.
Note: Covered and refrigerated, the pickled carrots should last a month or two.
Every year we get a few days where temperatures reach triple digits or at least well into the 90's. I am not a fan of hot weather. But the heat propelled me to make an ice cream that I was interested in tasting but skeptical of making. I really like my ice cream to be dense and ultra creamy. The term "icy" when referring to ice cream is something I've always tried to avoid.
However, the thought of making an ice cream with a custard base did not sound remotely appetizing. The extra work of tempering and heating the egg/cream mixture along with the richness that the eggs impart to the ice cream just seemed too heavy for such a hot day. So I set out to make this ice cream from Alice Medrich. Oh Alice, I never should have doubted you! She was correct in describing this ice cream as somewhat "icy". But not in a bad way, in a completely satisfying way. It is icy and creamy at the same time.
The cream mixture is simmered and left to infuse with cacao nibs. Cacao nibs are the roasted, shelled cacao beans broken into bite-sized pieces. They are the raw material from which all chocolate is made. Nibs have a nutty flavor and are very crunchy. They are the essence of pure chocolate. I use them often in baking, so the notion of infusing their flavor into cream intrigued me.
The flavor is beguiling. I'm not sure that you would be able to say what it was if you didn't know. It definitely tastes like chocolate, but a whisper of chocolate. It is delicate and totally delicious.
1 1/2 cups heavy cream 1 1/2 cups whole milk 1/3 cup cocoa nibs 1/2 cup sugar 1/8 teaspoon salt
Bring the cream, milk, nibs, sugar and salt to a simmer in a medium saucepan over medium heat. Remove from the heat, cover, and let steep for 20 minutes.
Pour the cram mixture through a fine strainer, pressing on the nibs to extract their liquid, discard the nibs. Refrigerate at least 4 but preferably 12 hours. Freeze the mixture according to the instructions on your ice cream maker.
makes 3 1/2 cups.
I bought some cherries at the farmer's market, and they were the perfect complement to the cacao nib ice cream. I just pitted them, tossed them with some sugar and brandy, and let them macerate for a couple of hours. The cherries became slightly softened and juicy, but retained their fresh character.
Fresh Cherry Compote
1 pound of cherries 2-4 tablespoons sugar (depending on sweetness of cherries) 1/2 tablespoon kirsch or brandy
Remove the pits from the cherries. Toss the cherries in a bowl with the sugar and brandy. Let the cherries macerate for at least an hour. They will release their juices and soften a bit.
 Sometimes I overbuy beautiful fruit at the farmer's market. Usually it's a way to force myself to make something new. A couple of weeks ago I bought a few pounds of peaches. We were going to have dinner with friends, and I thought that I would make a peach crostata for dessert.
 I had been eyeing a recipe for pickled peaches in the Chez Panisse Fruit Cookbook to serve with grilled duck breasts, but it just didn't seem to have the right balance I was looking for.
  So that settled it. I was going to make a peach and fig chutney. The sweet richness of the figs was just what I wanted to mellow out the "pickled" peaches. The original recipe called for the addition of pickled ginger which I left out. I didn't want a chutney with too much going on. The fruit was so beautiful, and I really just wanted to let their beauty shine through.
 I also decided to leave the chutney on the juicy side so that it would have a bit of sauce to drizzle around the grilled duck. It was delicious! The chutney had the perfect sweet-tartness to balance out the richness of the duck. We served it with a bottle of pinotage that we brought back from South Africa last year. Perfect.
 Peach and Fig Chutney




 The cream mixture is simmered and left to infuse with cacao nibs. Cacao nibs are the roasted, shelled cacao beans broken into bite-sized pieces. They are the raw material from which all chocolate is made. Nibs have a nutty flavor and are very crunchy. They are the essence of pure chocolate. I use them often in baking, so the notion of infusing their flavor into cream intrigued me.


 Posts
Posts


