Tuesday, February 10, 2009

Bruscetta With Ricotta and Escarole


This is the kind of thing I could happily eat every day. During the cooler months I constantly crave braised greens. I often braise them with beans or chickpeas and serve with a poached egg for dinner. They are great smeared on a pizza or just on top of some grilled bread for a quite tasty and satisfying lunch. I was fortunate to have some homemade ricotta on hand, but fresh mozzarella would be just as fine. I will often forgo the cheese and top with a poached egg.


This dish has quite a lot going on for being so simple. The braised escarole is slightly bitter (like most chicories), there is brininess from the olives and capers, a tingle on the back of the tongue from the vinegar, spice from the chili flakes, and it sits on a fluffy base of sweet, creamy ricotta. It really doesn't get much better.


Braised Escarole

2 tablespoons olive oil
3 garlic cloves (minced) + 1 for rubbing bread
1/4 teaspoon red pepper flakes
1 head escarole chopped
2 tablespoons olives coarsely chopped (I prefer nicoise)
1 tablespoon capers
up to 1 tablespoon red wine vinegar
Salt to taste
1/2 cup ricotta
4 slices of good bread (Italian or Sourdough)

Heat a saute pan over medium flame. Add the olive oil, garlic and chili flakes. Cook for about a minute until the garlic just starts to color. Add the olives and capers and cook for a few seconds. Add the escarole and turn the heat up to high. The escarole will give off quite a bit of water as it wilts. Let it braise, stirring occasionally, until most of the water has evaporated. This should take about 10 minutes. Taste and correct for salt. The olives and capers add a bit of salt so I usually wait until the moisture has reduced before I add extra salt. Add some red wine vinegar to taste. I probably added a tablespoon. Just add a teaspoon at a time and taste after each addition. You may need to adjust for salt again because adding vinegar counters the taste of salt. Set aside.

Lightly coat the bread slices with some olive oil. Place in the toaster or grill. Rub the grilled bread with a clove of garlic. This adds some bite, as in spicy garlicky heat, to the bread and makes it irresistible. Top the bread with a smear of ricotta. Sprinkle the ricotta with some fleur de sel (kosher salt would also be fine). Top with the escarole mixture.

makes about 4 slices of bruscetta.

Sunday, February 8, 2009

Ribollita: A Lovely Use For Stale Bread

It finally feels like winter again! The weather has been so strange. It has felt like Spring or Summer for weeks, but a few days ago it started raining again. I love lazy Sundays when it is cold and rainy outside. It's a perfect excuse to stay in pajamas all day and make soup or other things that need hours on the stove. It is so comforting when the aroma of something simmering on the stove permeates the house.

Speaking of comforting, I think that bread could arguably be considered one of the greatest comfort foods of all time. And ever since I read Molly's "Sog Story", I have been enamored of soggy bread. I love panades, but something equally as comforting and less labor intensive is Tuscan Bread and Bean Soup, aka Ribollita. I actually find myself buying extra bread just to keep stale bread on hand. The cubes of bread take on a silken texture when soaked with broth. They become like dumplings in the soup. Completely satisfying. Those Tuscans and their peasant food, a lazy Sunday would not be the same without them.


Ribollita-Today's Version
This is just stuff that I had on hand today. Any number of other vegetables and leafy greens can also be used. This is also a great use for Parmesan rinds. I keep leftover Parmesan rinds in a bag in the refrigerator to flavor soups and stocks for making risotto.

1 pound of dried cannellini beans
1 large onion chopped
3 large carrots chopped
3 celery stalks chopped
6 garlic cloves diced
6 sprigs thyme
2 bay leaves, preferably fresh (the perfume that fresh bay leaves impart is rather intoxicating)
about 1 quart of broth (I like this one)
Parmesan rind (optional)
14 ounce can of san marzano tomatoes crushed
about 8 cups of chopped kale (cavolo nero or dinosaur kale is traditional and my favorite)
about 1 pound of stale Italian or sourdough bread, crust removed and cut into 1 inch cubes
Salt and pepper to taste

Place the dried beans in a large pot and cover with about 3 inches of water. Leave to soak overnight or bring to a boil, cover, turn the heat off and leave to soak for 1 hour.

In a saute pan over medium heat, add about 2 tablespoons of olive oil. Add the onion, carrots, celery, garlic, thyme, and bay leaves. Saute for about 10 minutes, until the vegetables give off their water and the onions become translucent.

Bring the beans to a boil and add the sauteed vegetables and quart of broth. Add the canned tomatoes by crushing them through your fingers into the pot. Add the Parmesan rinds if using. Simmer partially covered for 1-1 1/2 hours, until the beans are soft.

Remove the Parmesan rinds, bay leaves and thyme branches. Using a hand held immersion blender, blend for about 5 seconds to partially puree the beans and vegetables. This makes the broth creamy while leaving most of the vegetables and beans intact. It is not necessary to blend the soup but it does give the broth some nice body. Add some salt to taste. Don't add salt until the beans are soft. Adding salt too soon can toughen the skin of the beans and prevent them from softening completely.

Add the kale, cover and simmer for about 15 minutes. Taste and correct for salt. Add the bread, cover and simmer another 10 minutes.

Serve with a drizzle of olive oil and more Parmesan

Saturday, February 7, 2009

Anson Mills Buckwheat Flour: A Cake


Nearly 2 and a half years ago I had my first introduction to the world of food blogs. I was volunteering for CUESA's Sunday Supper. CUESA is the organization that runs the Farmer's Market at the Ferry Building in San Francisco, and the Sunday Supper is their annual fundraiser. It is quite the event if you are into food and the restaurant scene in the Bay Area. I would say that there is somewhere in the area of 30-50 local chefs that are involved. I was a bit star struck that night because to me, these people are celebrities.

I was fortunate enough to be in the room where first courses and desserts were being plated up. It also meant that I was able to taste most of them. One of the desserts that has remained in my mind was a Buckwheat Gateau with Brown Butter Creme Anglaise and Poached Fall Fruit prepared by Shuna Fish Lydon. It was simple, seasonal, and outstanding. It had a dense and chewy texture that I found completely addictive. I even stole a piece to bring home for later. I don't think she minded (I hope not, wink).

Keri had met Shuna before and told me about her blog. So I checked it out and quickly realized that a whole world of food blogs existed. I suddenly had quite a bit of surfing to do on the web. I mean really, I had a lot of catching up to do.


After browsing Shuna's Blog, I realized that she had posted a recipe for her Buckwheat Gateau Breton. Of course I had to recreate it! Ahem, unfortunately mine did not come out like the one I had had at the Sunday Supper. It did have the same dense and chewy texture, but it was much thinner, like less than half the height. Maybe I did not beat the butter mixture long enough to incorporate enough air bubbles? I assume that is an important step since there is no other leavening agent like baking soda or powder added. Shuna's post also talks about the use of Anson Mills Buckwheat Flour which I did not use. I used the organic bulk buckwheat flour from Berkeley Bowl which I thought would be good but maybe there really was something intrinsically special about the Anson Mills Buckwheat Flour?


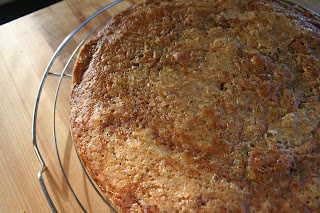
Finally, 2 years later I decided to give it another go. I even mail ordered some Buckwheat Flour (among others) from Anson Mills. I can't say that my attention to the details of the recipe made much of a difference. The recipe states that the batter should be split between 2 pans, but I added it all to one pan. It still resulted in a cake that was just 1 1/2 inches high. The cake that I remember was definitely over 2 inches high.

Despite the height, I think the cake is delicious. Louis said that he thinks the cake needs to be served with "something". I guess if I were to serve it to guests, I would adorn it with some fruit and perhaps that Brown Butter Creme Anglaise. But it did go really well with my coffee this morning. It is only slightly sweet and a bit earthy. This cake is quite moist and would keep well for about a week (as stated in the original recipe). I can imagine that it will serve me well throughout the week as a lovely afternoon treat when I get home from work.


Buckwheat Gateau Breton
(Adapted from Shuna Fish Lydon)

12 ounces unsalted butter at room temperature
1 1/2 cups sugar
6 egg yolks at room temperature
1 1/2 tablespoons orange flower water
3/4 teaspoon sea salt (I used Maldon)
2 cups all purpose flour
1 cup buckwheat flour
1 egg white, room temperature

Preheat oven to 325F.

Butter and flour a 9 inch cake pan (or 2 flouted tart pans, perhaps a better presentation). Beat butter until smooth and light in color in a mixer with the paddle attachment on medium speed. Add sugar and beat until fluffy. Scrape down bowl. Add egg yolks one at a time and incorporate fully after each addition. Add orange flower water and sea salt, scrape down bowl and beat for at least 2 more minutes.

Sift both flours and turn mixer down to lowest setting. Add flours gently in thirds just until batter is uniform. Divide batter equally between 2 tart pans or one cake pan. Press batter into pans with a small offset spatula. The batter is quite thick.

Whisk the egg white vigorously until very frothy. spoon on top and spread evenly. Sprinkle a bit of turbinado/raw sugar on top. This creates a lovely crackly top and provides a bit of contrasting texture to the cake.

Thursday, February 5, 2009

A Get Well Package: Chocolate Chip Cookies

A family member living hundreds of miles away was recently in a very bad car accident. She is lucky to be alive. Unfortunately there is not much I can do for her except send my love and support, and some chocolate chip cookies. Really, what's more soothing and comforting than a chocolate chip cookie? Well I suppose there is chicken noodle soup, roast chicken with mashed potatoes, soft cheesy polenta with greens and a poached egg, or a chard, onion and gruyere panade (my personal favorite, what's yours??), but none of those travel well.

I came across a recipe last summer for the ultimate chocolate chip cookie. It boasted that one of the secrets to a great chocolate chip cookie is letting the dough rest. Not rest for an hour, like pastry dough or other cookie doughs. Rest for 36 hours! That's nearly 2 days from the time that you make the dough! Usually when you make chocolate chip cookie dough, it's because you want a warm and gooey cookie within the next hour. Was it really worth it to plan that far ahead?

I must say I was a bit skeptical, so being scientific by nature (and profession), I set up a simple experiment. I put the dough together on day 1. I baked a batch of cookies on day 1. I baked a second batch on day 2, and a 3rd batch on day 3. And guess what? The cookies that were baked on day 3 were definitely the best. They got more caramelized and crisp outside while remaining soft and chewy inside. I think it is the combination of crisp and chewy that makes these highly addictive. And the fact that I sprinkled maldon salt on the dough before it went into the oven.

I have found that anything with caramel or chocolate benefits from a bit of salt. Most things need salt to heighten their flavor, but with caramel and chocolate, I like to taste the salt. Please don't use table salt for this. It's too harsh. There are particular salts that are meant to be used as condiments, not for all purpose seasoning.
Chocolate Chip Cookies

The ingredients are given in weights and measures. If you have a scale, it is much easier to weigh out the ingredients than to measure which I find sort of tedious, especially when packing brown sugar or the 2 cups minus 2 tablespoons nonsense below.


2 cups minus 2 tablespoons (8 1/2 ounces) cake flour
1 2/3 cups (8 1/2 ounces) bread flour
1 1/4 teaspoons baking soda
1 1/2 teaspoons baking powder
1 1/2 teaspoons coarse salt
2 1/2 sticks (1 1/4 cups) unsalted butter
1 1/4 cups (10 ounces) light brown sugar
1 cup plus 2 tablespoons (8 ounces) granulated sugar
2 large eggs
2 teaspoons pure vanilla extract
1 1/4 pounds bittersweet chocolate chips, at least 60% cacao (I just used 1 10 ounce package)
Sea salt

Sift flours, baking soda, baking powder and salt into a bowl. Set aside.

Using a mixer fitted with the paddle attachment, cream the butter and sugars together until very light, about 5 minutes. Add eggs, one at a time, mixing well after each addition. Add the vanilla. Reduce the speed to low, add the dry ingredients and mix until just combined. Add the chocolate chips and mix briefly to incorporate. Press plastic wrap against dough and refrigerate for 24-36 hours. Dough may be used in batches and stored in the refrigerator up to 72 hours.
When ready to bake, preheat the oven to 350F. Line a baking sheet with parchment paper or a nonstick baking mat. Set aside.

Use an ice cream scooper to scoop mounds of dough (the size of generous golf balls) onto the baking sheet. Sprinkle lightly with sea salt and bake until golden brown but still soft, 15-20 minutes depending on you oven and the size of your cookies. Transfer sheet to a wire rack for 10 minutes, then slip cookies onto another rack to cool a bit more. Repeat with remaining dough, or reserve dough, refrigerated, for baking remaining batches the next day.

Yield:18-24 cookies (depending on size)